Build and ship an order
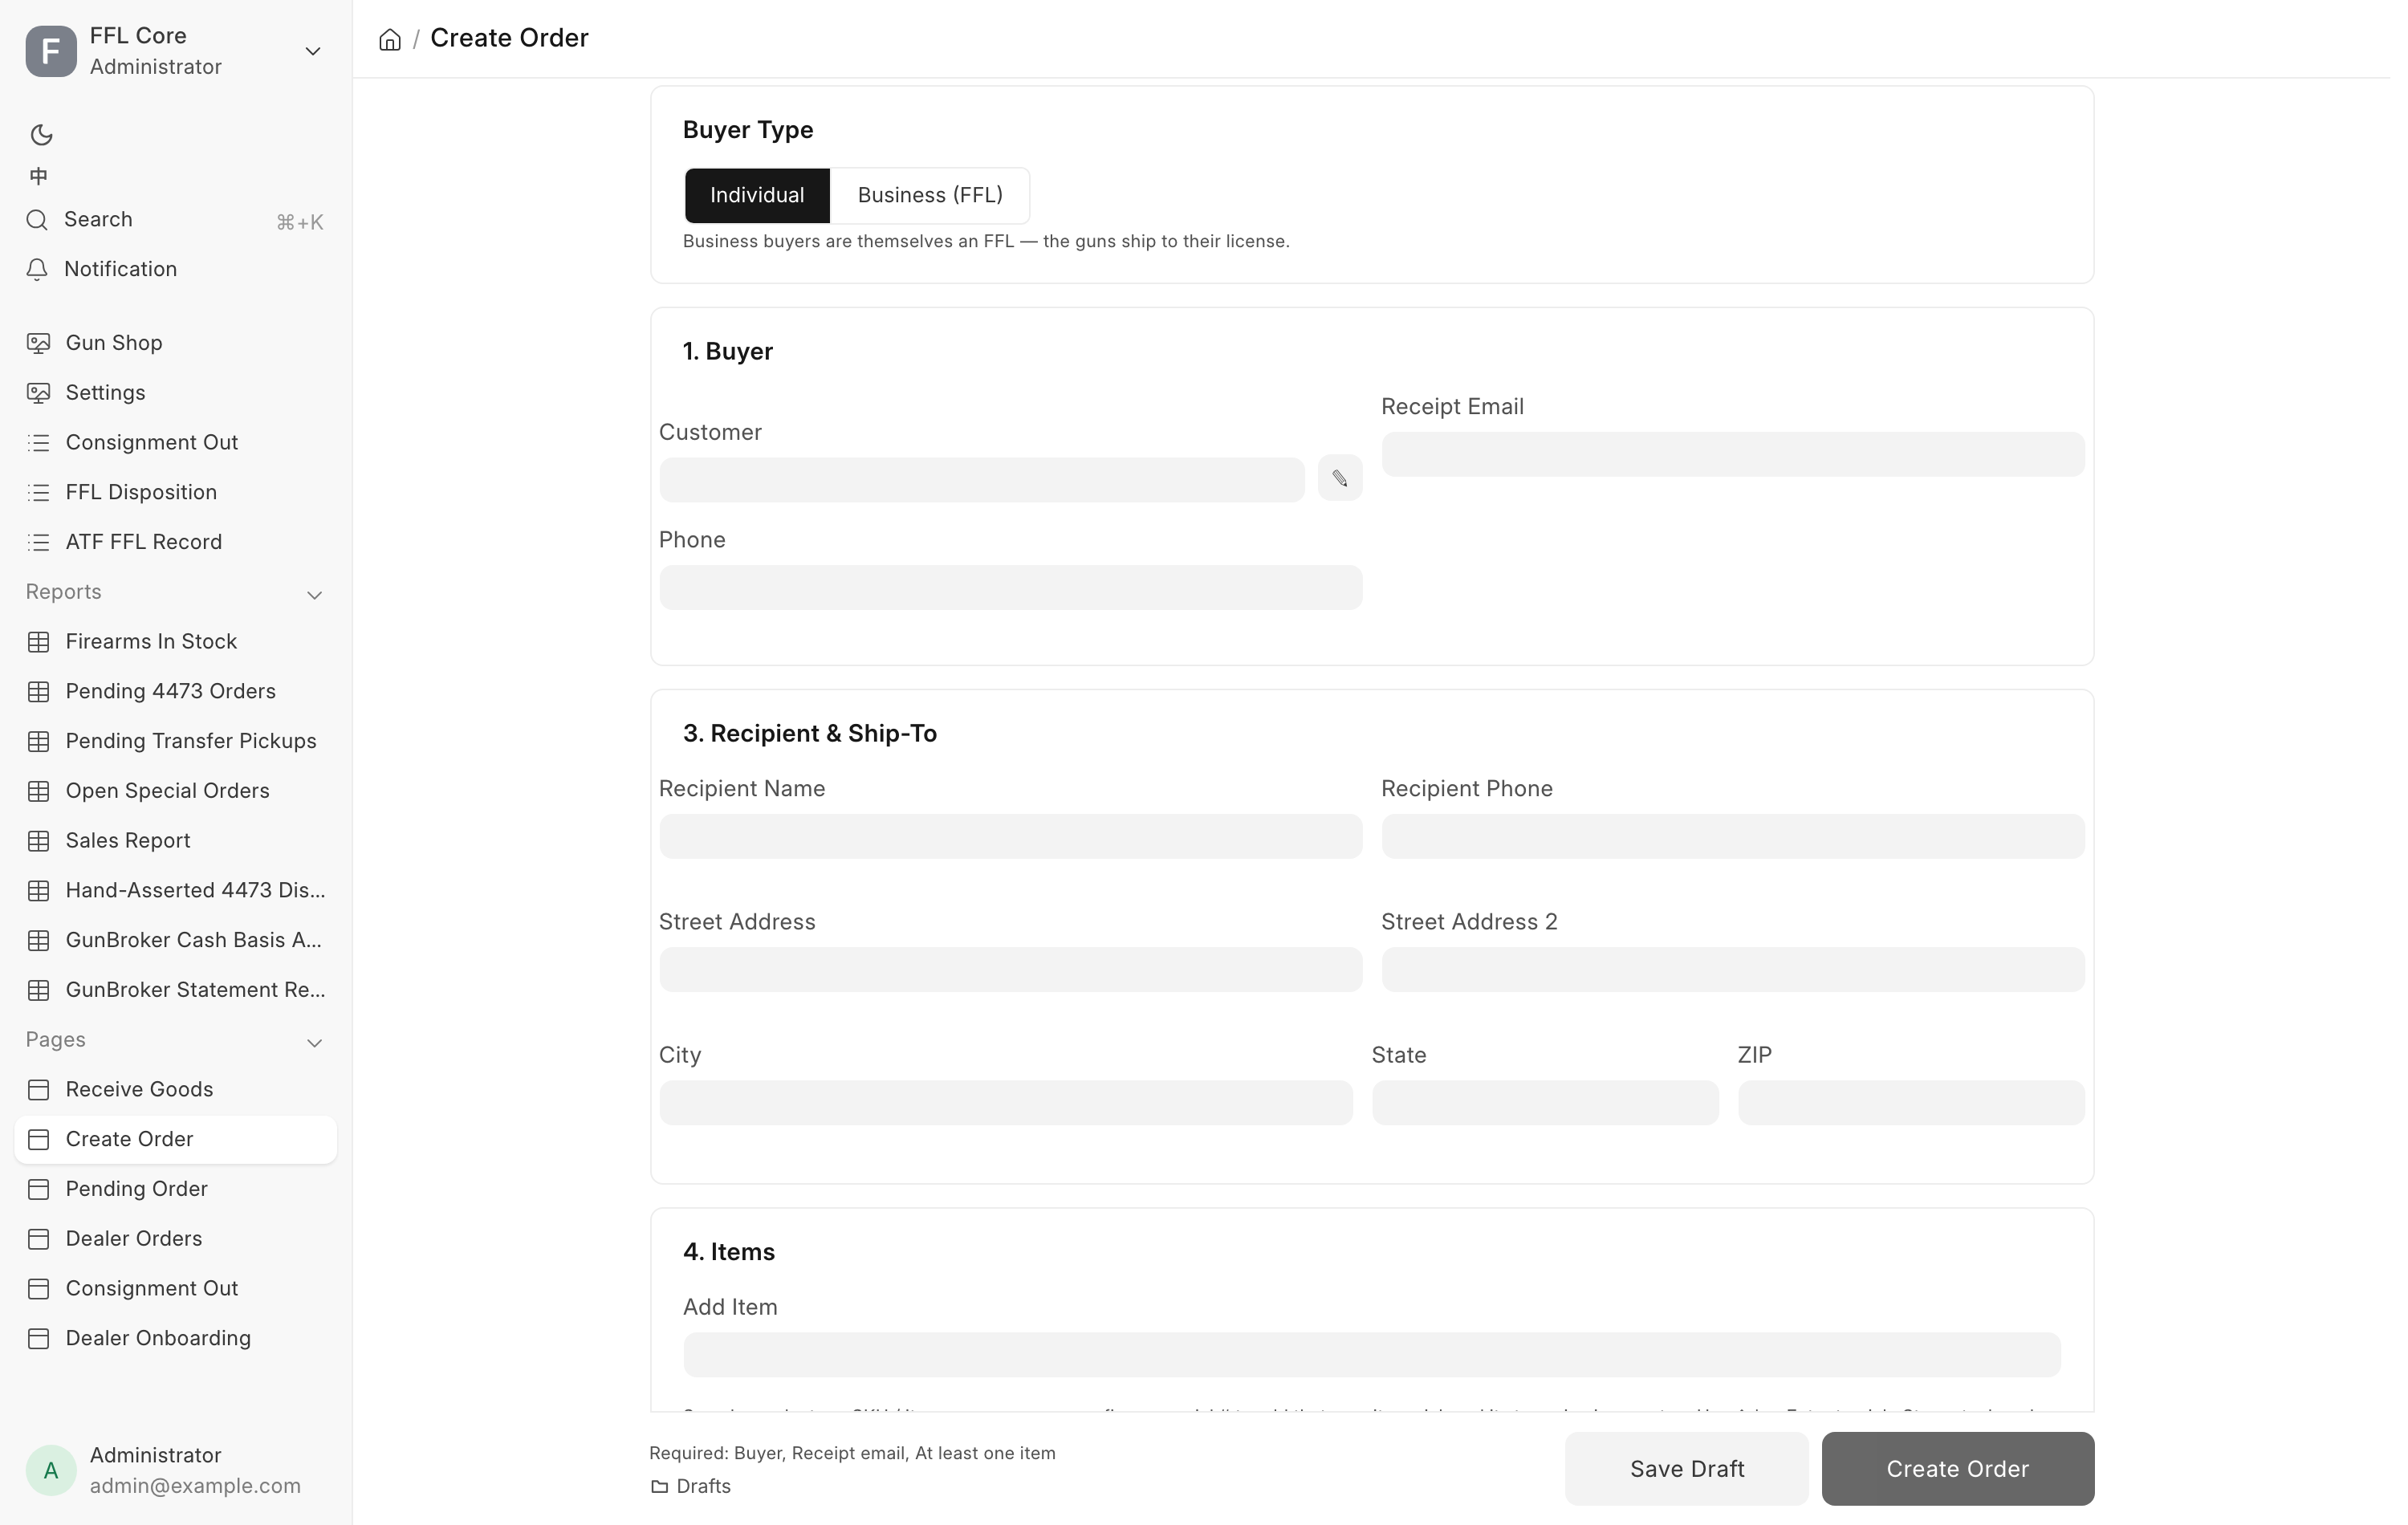
Counter staff use the Create Order page when the buyer is not walking out with the goods. It builds an order for a firearm mailed to another dealer's FFL, for accessories shipped to a buyer, for a business buying on its own license, or for anything a distributor drop-ships.
Open it from the Create Order tile on the Gun Shop workspace, or go to
/app/create-order.
Before you start
- You need one of these roles: Sales User, Sales Manager, Stock Manager, or System Manager.
- A POS Profile must exist for the company that stocks the guns. You do not have to open a POS shift first.
- If a firearm is going to another dealer, that dealer's license must be on file as an ATF FFL Record, unexpired, with a complete street address and state. See verifying an FFL.
- The page never runs a Form 4473. The buyer completes theirs at the receiving dealer. A gun handed over at your counter goes through the POS instead.
Buyer Type
Two buttons at the top: Individual and Business (FFL).
Pick Business (FFL) when the buyer is another licensed dealer buying on its own license. The guns ship to that license, so the page does not ask for a separate destination. Pick Individual for a retail customer.
The choice also sets the payment rule. An individual's firearms may not leave the store until the order is paid in full. A business may ship on account.
1. Buyer
For an individual, fill in:
| Field | Notes |
|---|---|
| Customer | Lists customers that are not FFL dealers. |
| Receipt Email | Required. This is where the receipt is sent. |
| Phone | Optional. Filled from the customer record when blank. |
The pencil button beside Customer opens Fix Customer Name. Type the corrected spelling in Correct Name and click Rename. This renames the customer everywhere in the system, so use it for spelling fixes only. To sell to a different person, pick a different customer.
For a business buyer, pick the dealer in FFL (ATF Record). Two buttons sit beside it:
- Verify FFL checks the license against ATF eZ Check and refreshes the record.
- Lookup by FFL # opens a dialog where you type an FFL Number and click Lookup. A license not yet on file is fetched and created.
Once the FFL resolves, the page creates or reuses that dealer's customer record, sets the destination to their own license, and fills the ship-to from the license premises. A card below shows the licensee, the address, and a badge reading either Valid to with a date or Expired / unverified.
Tax exempt
Business buyers get a Tax Exempt (resale/exemption certificate on file) checkbox. Ticking it drops sales tax from this order and stores the exemption on the customer record when you create the order.
The certificate is optional. Click Upload Certificate to attach a PDF, PNG, or JPG. When one is already attached the page offers view and replace links instead. The checkbox alone is what exempts the order. Whether you also need the paper certificate on file is a matter for your accountant and your state.
2. Destination FFL
This section appears only for an Individual buyer once the order has at least one firearm line. It carries the same Verify FFL and Lookup by FFL # buttons, and the same license card.
The order cannot be created without it. The system rejects a destination that is expired, missing from the file, or missing a street and a valid state, because the state is what decides sales tax.
3. Recipient & Ship-To
Recipient name, phone, street address, city, state, and ZIP.
When a destination FFL is set, the page fills these from the license premises and locks them. A note reads "Locked to the destination FFL address (firearms ship to the FFL)." Clear the FFL to unlock them.
For an order with no FFL, type the buyer's address here. Leave it empty and the order books as a counter pickup with no shipping label.
4. Items
Type into Add Item. One box takes all of these:
- a scanned barcode,
- a SKU or part of an item name,
- a firearm serial number.
Use the up and down arrows and Enter to pick from the dropdown. Store stock and distributor catalog results appear in the same list, store stock first.
Scanning a serial adds that exact gun, its serial, and its tag price as a finished line in one step, so a scanner can run through several guns without touching the mouse.
Picking a serial for a firearm
Choosing a firearm from the dropdown opens a card with Serial (in stock), Qty, and Price. Pick the serial and the price follows that gun's own selling price. Quantity is fixed at one per serial. Click Add to Order, or Cancel to drop the card.
A serial already on the order is refused a second time.
Drop-ship lines
Picking a distributor result quotes it and shows cost, live quantity, and whether direct drop-ship is available. Set Qty and Price, then click Add to order.
A drop-ship line lands unconfirmed. It shows a Drop-ship tag with the distributor name and the word "unconfirmed", and the order cannot be created until you run the fulfillment plan below. See drop-shipping.
The line table
Each line shows a Firearm tag where it applies, the serial beneath the name, quantity, price, and subtotal. Price is editable in place on every line. Quantity is editable on non-firearm lines. The ✕ button removes a line.
Below the table sit Shipping, a tax preview, and the running Total. The tax preview reads "Out-of-state — no sales tax" when the ship-to state is not your home state, and "Tax exempt — no sales tax" when the exemption is on. The server recomputes the real tax from the shipping address when the order is created.
Plan fulfillment
The Plan fulfillment link sits next to the line count. It turns into a highlighted pill whenever a line still needs a channel.
Clicking it quotes every channel at once and opens the Fulfillment plan dialog. Rows are your order lines. Columns are Local stock and every enabled distributor. Each cell shows what that channel can do: quantity in stock for local, cost and live quantity for a distributor. Click a cell to choose that channel for that line.
Where local stock is short, the local cell offers to split the line. Clicking it keeps the on-hand quantity as a local line and moves the remainder to a new line you then route to a distributor.
The summary line at the bottom counts the legs and shows the sale total, the drop-ship cost, and the margin excluding local cost.
Click Apply plan. The system sets up an Item for each drop-ship line and marks the lines confirmed. Any line that fails is listed under "Plan partially applied" and stays unconfirmed.
Once confirmed drop-ship lines exist, section 6 stops offering the dispose choice and shows the legs instead, because a drop-ship order always defers.
5. Payment
| Control | Notes |
|---|---|
| Payment Method | Cash, Credit Card, Zelle, or ACH. |
| Amount | Defaults to the grand total. Type less for a deposit. |
| Payment received | Tick when the money is in hand now. |
| Transaction Number | Appears for Zelle, labeled Zelle Transaction Number. |
On a store taking cards on a standalone terminal, the same field appears for the card tender as Card Approval Code.
Entering less than the total shows a deposit note with the balance still due. If the buyer is an individual and you also chose to ship now, that note turns red: an individual order needs full payment before the guns move.
Leave Payment received unticked to book the order on account. Collect later with Record Payment on the Pending Order queue.
Never type a card number
The reference field is for an approval or confirmation code. The system rejects anything that looks like a full card number, because that would put cardholder data into an accounting voucher.
6. Fulfillment
Two buttons, defaulting to Create only — dispose later.
- Create only — dispose later puts the order on the Pending Order queue. The gun stays in stock and on the bound book until you ship it.
- Dispose & ship now books the transfer, takes the gun out of stock, and pushes to FastBound as part of creating the order.
Order Note (staff) below is internal. It shows on the Pending Order queue and is saved on the invoice, and it is kept off the customer's printed invoice.
Create the order
The bar at the bottom shows what is still missing, as "Required:" followed by a list, and turns green with "Ready to create." when nothing is. Click Create Order.
What the system does
- Builds and submits a Sales Order, then a Sales Invoice derived from it.
- Applies destination-based sales tax, or none when the buyer is exempt.
- Books the payment. A full payment rides on the invoice as a counter tender. A deposit books as a separate Payment Entry right after submit.
- Emails the receipt to the address in Receipt Email.
- With Dispose & ship now, books one FFL transfer disposition per serial, issues the stock, and queues the FastBound push.
- Where ShipStation is enabled, pushes the shipment so staff buy the label there.
- Deletes the draft you resumed, if any.
The Order Created dialog then links the Sales Order and the Sales Invoice, states what was paid or left outstanding, and says whether the order was disposed or queued. Print Invoice opens the invoice print view in a new tab.
Dispose is a bound book entry
Disposing books the transfer in the bound book and sends it to FastBound. Do this only when the gun is really leaving. Undoing it means cancelling the whole order.
An order containing any drop-ship line always defers, whatever you chose. ERPNext cannot move stock for a line the distributor ships. The page says so when you create it.
Save Draft and Drafts
Save Draft parks the half-built form. Drafts are shared shop-wide, so one person can park an order and another can finish it.
Drafts opens the saved list with each draft's title, who touched it last, when, and its item total. Load restores it. The ✕ button deletes it. Loading a draft over a form you have already started asks for confirmation first.
A draft reserves nothing. Serials are re-checked when the draft is loaded, and any gun that has since sold or been claimed by another order is dropped from the form with the reason given.
Editing an order
Orders you have not yet disposed or shipped can be edited from the Edit
button on the Pending Order queue, which opens
/app/create-order/edit/<invoice>.
An orange banner reads "Editing" with the invoice number and warns that saving cancels it and creates a replacement invoice. Exit without saving leaves.
The Payment and Fulfillment sections are replaced by a read-only Money summary showing what has been paid so far and what happens on save:
- a lower new total shows the refund that will be made,
- a higher new total shows the balance left to collect,
- changing the buyer refunds the whole amount to the original buyer and starts the new order unpaid.
When a refund is due, pick a Refund Method. Zelle also asks for the transaction number. The staff order note moves up under the Money block so you can read and change it. The submit button reads Save Changes, and saving returns you to the queue.
Editing is refused once the order has a booked disposition, has been pushed to ShipStation or marked shipped, or has a submitted Delivery Note. Use Cancel Order and rebuild instead.
Troubleshooting
| Message you see | What it means | Fix |
|---|---|---|
| Required: Destination FFL | The order has a firearm and no destination. | Pick and verify the receiving dealer. |
| Required: Fulfillment plan (unconfirmed drop-ship lines) | A distributor line has no confirmed channel. | Click Plan fulfillment, then Apply plan. |
| Destination FFL is not on file | The license has never been fetched. | Use Lookup by FFL #, then Verify FFL. |
| Destination FFL Expired | The license on file has lapsed. | Run Verify FFL to refresh it. |
| Destination FFL Address Incomplete | No street or no valid state on the record. | Open the ATF FFL Record and complete it, or verify it again. |
| Individual orders must be paid IN FULL before shipping | You chose Dispose & ship now with a deposit. | Collect the balance, or switch to Create only — dispose later. |
| Enter the ACH Transaction Number to mark this order paid by ACH | The page hides the reference box for ACH, but the server requires it. | Switch Payment Method to Zelle to expose the box, or leave Payment received unticked and collect through Record Payment. |
| Some firearms are no longer available | A gun on the draft sold or was claimed since you saved. | Pick replacements from the item search. |
| Wrong company for this inventory | The guns belong to a different company than your POS Profile. | Use a POS Profile for that company, or open a shift on it. |
| That reference looks like a full card number | A card number was typed into the reference box. | Enter the terminal's approval code instead. |